Applying online is a three-step process. You must (1) register and activate your personal account, (2) set up an organization profile (if applicable), and then (3) fill out an application.
Follow these steps to apply online, and to troubleshoot issues that may arise during the online application process.
Note: the screen captures may change slightly as Nova is refined.
Before You Begin
Step 1: Register Your Personal Account, Then Activate It
Step 2: Set Up an Account for Your Organization/Group (if applicable)
Step 3: Start Your Application
Questions?
- For the quickest response to questions you have about preparing and submitting your applications or final reports in Nova, email the program administrator for the program. Please refer to the OAC staff directory for contact information.
Before You Begin
Technology Requirements to Use Nova
- High-speed internet access.
- Computer with at least 1.6 GHz processor, 1 gigabyte of memory and working antivirus software.
- The latest version of one of the following web browsers, with pop-up windows enabled:
Browser Options for PC
- Chrome (Recommended)
- Internet Explorer
Browser Options for Mac
- Firefox (Recommended)
- Chrome
- Safari
- We do not recommend using Safari.
Step 1: Register Your Personal Account, Then Activate It
Register Your Personal Account
- Go to grants.arts.on.ca.
- Click on the Register Here button, near the bottom of the page.
- Fill out and submit the Nova registration form.
- Note: the email address you use to create an account should be your own personal address, not a shared address.
- Check your email for a message with the subject line “Welcome to NOVA.”
Troubleshooting tips: If you get a pop-up window that says “contact with this email address already exists in our database”.
- This means that there is already a Nova account connected to your email address. This is nothing to worry about, though – most likely, it means that OAC had your email address on file from a previous grant application you submitted.
- To access your account, you will need to request a new password:
- Click on Forgot Password, located under the Nova login button.
- Follow the instructions onscreen.
- Check your email inbox for a message from donotreply@arts.on.ca.
- Click the link in the email, then create a new password.
Activate Your Personal Account
- Log in to your account.
- Review the section called Important Information Before You Apply.
- Add/update your contact information by going to the Profile drop-down list at the top right, and choosing Update Profile. Make sure to fill out all mandatory fields.
- Note: The email address in this section is the same email you used to register your account. If you change your email address in this section, you’ll then need to use the new email to log in.
- Review the section called Terms and Conditions / Notice of Collection. Confirm that you accept the conditions of access.
- Click the Activate button at the bottom of the screen. If you miss this step you will not be able to apply for a grant.
Step 2: Set Up an Account for Your Organization/Group (if applicable)
Initial Set-Up
If your organization has applied for an OAC operating grant before:
- You will receive an email with instructions on how to access your organization’s profile in Nova at least two months before the deadline for your program.
- If you haven’t received an email by this point, please contact the program officer.
- Once you have access to your organization’s profile, review the information already in Nova. Click on Profile in the top right corner. Then, select Update Organization Profile from the drop-down menu.
- Review and update the information listed, then click Save Draft.
If your organization/group has applied for an OAC project grant before:
- Log in to Nova using your personal account.
- To make sure you're in your personal account, look for your name in the Applications for… section of the homepage. If you see the name of an organization there, open the Switch Organization menu
in the top right corner of the screen, then select *Personal / Personnel from the drop-down list.
- Go to Profile in the top right corner of the page. Choose Request Affiliation with an Organization/Group from the drop-down menu.
- Type the name of your group into the search field and select your organization’s name from the search results.
- Note: If your organization’s name doesn’t appear in the search results, you will need to set up an account for the organization. See the next section for information on how to do this.
- Complete the mandatory fields on-screen, including your role/title within the organization and your business email address. Then, click on the Submit button.
- Note: The email address you enter here is the one OAC will use for correspondence with you. It should be the email address you use for your work with this organization. It can be the same as or different from your login email.
- One of two things will happen, depending on whether you’re the first in your organization to access its Nova profile:
- If you are the first person, your personal profile will automatically be affiliated to your organization’s profile.
- If someone else in your organization is already affiliated with its profile, you will need to request an affiliation. See the section Requesting an affiliation for how to do this.
If your organization/group has never applied for an OAC grant:
- Log in to Nova using your personal account.
- Create a profile for your organization by going to Profile in the top right corner of the page, then choosing Request Affiliation with an Organization/Group.
- Click on the button that says Register New Organization/Group.
- A pop-up window will appear. In the Operating Name field, enter the name of your organization.
- Select an option from the Organization Type drop-down menu. Click Submit.
- Complete the mandatory fields onscreen, including your role/title within the group and your email address. Then, click on the Submit button.
- Note: The email address you enter here is the one OAC will use for correspondence with you. It should be the email address you use for your work with this organization. It can be the same as or different from your login email.
Managing Affiliations
Requesting an affiliation with an organization/group
- Log in to Nova using your personal account.
- To make sure you're in your personal account, look for your name in the Applications for… section of the homepage. If you see the name of an organization there, open the Switch Organization menu

in the top right corner of the screen, then select *Personal / Personnel from the drop-down list.
- Go to Profile in the top right corner of the page. Choose Request Affiliation with an Organization/Group from the drop-down menu.
- Type the name of your group into the search field and select your organization’s name from the search results.
- Note: If your organization’s name doesn’t appear in the search results, you will need to set up an account for the organization. See the section titled If your organization/group has never applied for an OAC grant.
- Complete the mandatory fields on-screen, including your role/title within the organization and your business email address. Then, click on the Submit button.
- Note: The email address you enter here is the one OAC will use for correspondence with you. It should be the email address you use for your work with this organization. It can be the same as or different from your login email.
- One of two things will happen, depending on whether you’re the first in your organization to access its Nova profile:
- If you are the first person, your personal profile will automatically be affiliated to your organization’s profile.
- If someone else in your organization is already affiliated with its profile, they will receive an email noting that you have requested to be affiliated. Once they approve your affiliation, you will be sent an email confirmation.
Approving requests for affiliations
- To approve a request for affiliation to your organization, click on Profile in the top right corner. Then, select Manage Organization Affiliations from the drop-down menu.
- You will be directed to the Requestor page. Select the requestor.
- You will then be directed to their Affiliation Details page. Scroll to the bottom of the page and click Approve.
- You can select an affiliation end date for a requestor to have access for a set period of time.
Removing organization/group affiliations
- If you disassociate a person from your organization’s profile, they will no longer be able to access it.
- To disassociate a person from your organization’s profile, click on Profile in the top right corner. Then, select Manage Organization Affiliations from the drop-down menu.
- You will be directed to the Requestor page. Select the person who you wish to disassociate.
- You will then be directed to their Affiliation Details page.
- To disassociate this person immediately, select yesterday’s date under Affiliation End Date.
- You can also choose a date in the future when they will no longer be able to access the account.
Modifying an organization/group member’s title or contact information
- Click on Profile in the top right corner. Then, select Manage Organization Affiliations from the drop-down menu.
- You will be directed to the Requestor page. Select the person’s name.
- You will then be directed to their Affiliation Details page. Here, you can update a person’s title, email address and phone number.
Managing Your Organization/Group's Profile
Accessing your organization/group’s profile
To access your organization’s profile in Nova, you’ll need to switch from your personal profile to the organization’s profile. Once you’ve been affiliated to an organization (see previous section for information on this), you can follow the instructions below.
- To switch from your personal profile to your organization’s profile, open the Switch Organization menu
in the top right corner of the screen, then select your organization's name from the drop-down list.
- Note: You can be affiliated to more than one organization in Nova, so make sure to choose the correct organization here.
- You should now see the name of your organization in the Applications for... section of your homepage. This confirms that you have accessed the organization’s profile.
- To return to your personal profile, open the Switch Organization menu
in the top right corner of the screen, then select *Personal / Personnel from the drop-down list.
Modifying your organization/group’s profile
- After following the instructions above to access your organization’s profile, click on Profile, at the top-right corner of the screen. Select Update Organization Profile from the drop-down menu.
- Add/confirm your organization’s Operating Name and Legal Name.
- Choose your Organization Type. This will determine which mandatory fields appear on your application form, so be sure to choose the correct type.
- Assign the Key Contacts for your organization.
- For Head of Board/Governing Body Name, type the name of your Board Chair/President.
- In the field on the right, add their email address.
- Note: Their email goes here because they do not need to register a personal account in Nova.
- For Head of Organization, Head of Administration and Head of Artistic/Programming, you will see a drop-down menu with the names of people who have already been affiliated to the organization.
- If you don’t see a person’s name on this list, they need to request affiliation with the organization. Refer to the instructions in the Managing Affiliations section; once their request has been approved, you’ll see their name on the drop-down menu.
- Add/confirm your organization’s contact information, including Permanent Physical Address and Mailing Address.
Step 3: Start Your Application
Ensuring You Are on the Correct Profile
Individual artists
To apply as an individual, you must be in your personal profile. If you don’t see your name in the
Applications for... section of your homepage:
- Open the Switch Organization menu
in the top right corner of the screen.
- From the drop-down menu, select *Personal / Personnel.
- Check to make sure your name now appears in the Applications for... section of your homepage.
Organizations/groups
To apply on behalf of an organization, you must be in that organization’s profile. If you don't see the organization’s name in the
Applications for... section of your homepage:
- Open the Switch Organization menu
in the top right corner of the screen.
- From the drop-down menu, select the name of the organization.
- Check to make sure your organization’s name now appears in the Applications for... section of your hompage.
Finding the Right Application Form
Project programs
- Go to the section called Funding Opportunities.
- Locate the name of the program you wish to apply to, and then click Apply to begin.
- You can also start with the Details button for full program information.
Operating programs
- Your application form will be listed under the section called Applications for [Your Organization Name].
- Click Open to begin.
Working on Your Application
- Do not use the Back, Forward or Refresh buttons in your web browser. You may lose any unsaved work, or the system may log you out. Use Nova's built in "Back", "Next" and "Save" buttons instead.
- Save your work often to ensure you don’t lose it.
- Ensure that you only have Nova opened once. Opening Nova in more than one tab or window may cause you to lose your work.
- If you are collaborating on an application, keep in mind that the application can only be edited by one person at a time. Having multiple people edit an application at the same time may cause you to lose your work.
- As you work on your application, routinely click Validate Application. This will highlight any incomplete fields that you need to fill out.
- Some validation messages displayed above the application are direct links: click on them to locate the relevant part of the application.
- Remember to fill out all the information required on the Declaration tab of the application. If this section is incomplete, you will not be able to submit the application.
Uploading artistic examples
- Once you are in the application, go to the Support Material tab. Then check what file format(s) and size(s) are accepted for this program.
- To attach a file, scroll down to the section for your file type (video, audio, etc.) and click on Upload
.
- A pop-up window will appear with options to drag-and-drop or browse to upload your file. You can upload multiple files at once.
- After uploading the file, close the pop-up window.
- Next, click on Edit Required Information
, which will appear below your uploaded file and fill out the mandatory information about your file.
- If your file is 300MB or larger, you will need to upload the file to Vimeo. Under the Audio – Vimeo or SoundCloud Links or Video – Vimeo Links section, click Open and click on the plus sign and fill out the mandatory information.
Adding a co-applicant (if applicable)
- Begin your application.
- Go to the Add Individual Co-applicant or Add Organization Co-applicant tab of the application, located below the Main tab.

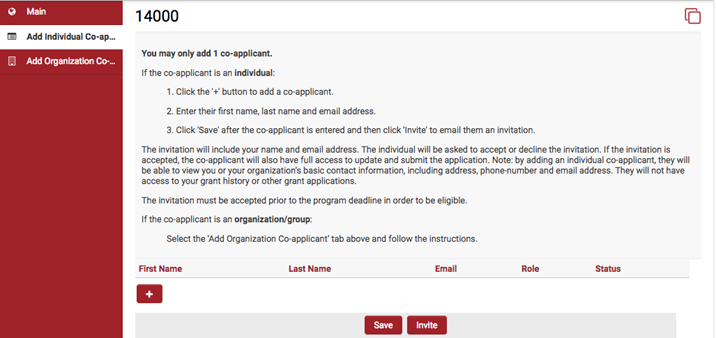
- Follow the instructions to add a co-applicant to your application.
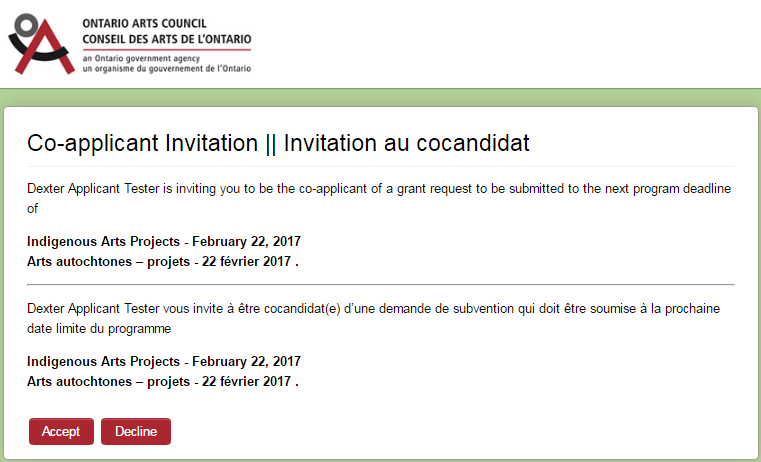
- The co-applicant will then be sent an email invitation to access the application, with an option to accept or decline.
- If they accept the invitation, both of you will see the application in your Applications for [Applicant Name] section. Now, either one of you can work on and submit the joint application.
Submitting your application
- When you are ready, press Submit Application at the bottom of the page.
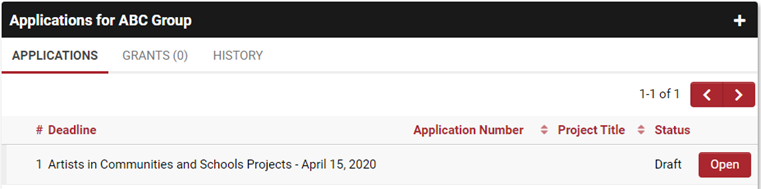
- Now, when you go to your Applications for [Applicant Name] section, the status of your application will have switched from Draft to Submitted.
- To download a copy of your application, click on Print Preview at the top of the page, and save your application as a PDF.
What happens to draft applications when a deadline closes?
- Your application must be submitted by 1 p.m. EST on the deadline date.
- The system will not notify you that the deadline has passed. If you are still working on your application past the 1 p.m. EST deadline, it will continue to allow you to complete your application but will not allow you to submit your application.
- The status of a draft application will change to Not Submitted at 1 p.m. EST on the deadline day. This status makes your application read-only.