[Skip to Content]
download Acrobat Reader
Facebook
Twitter
Youtube
-A
-A
+A
+A
Français
Contact Us
OAC.OpenMenu
Home
Grants
Expand
Activity
Expand
Funding Framework
Creating and Presenting
Building Audiences and Markets
Engaging Communities and Schools
Developing Careers and Arts Services
Discipline
Expand
Dance
Literature
Media Arts
Multi and Inter-Arts
Music
Theatre
Visual Arts
Priority Group
Expand
Artists of Colour
Deaf Artists and Artists with Disabilities
Francophone Artists
Indigenous Artists
New Generation Artists
Artists Living in Regions Outside Toronto
General Granting Information
Expand
New to OAC?
Nova User Guide
Guide to Operating Programs
Guide to Project Programs
Guide to Assessment
Grant Results
Grant Program Deadlines and Important Dates
Awards
Expand
Ontario Arts Council Awards
Chalmers Family Fund
Government of Ontario Awards
Expand
Pauline McGibbon Award
Premier's Awards for Excellence in the Arts
Ontario Arts Foundation Awards and Funds
For Donors
Access & Equity
Expand
Accessibility Plan
Expand
2017 Annual Status Report on Year Five of OAC’s Multi-Year Accessibility Plan
Equity Plan
Alternative Services and Application Processes
Priority Group
Expand
Artists of Colour
Deaf Artists and Artists with Disabilities
Francophone Artists
Indigenous Artists
New Generation Artists
Artists Living in Regions Outside Toronto
Public Feedback Form / Complaints
Guide to Providing Application Support
Would you like to be an OAC peer assessor?
Outreach and Development
News & Resources
Expand
News
Expand
Clelia Farrugia and Soraya Peerbaye named new Theatre and Dance Officers
Alexandra De Gasperis appointed to board of directors
OAC launches search as Theatre and Dance Officers announce retirements
Board of directors appoints Carolyn Vesely, new CEO
Upcoming changes to applicants' artistic examples in Nova
Resources
Expand
Annual Report 2018-2019
Annual Report 2017-2018
Grants Listing 2017-2018
Logo and Acknowledgment
Share your photos with OAC
Research & Impact
Expand
OAC Grant Statistics
Open Data
Performance Measures
Program Evaluation at OAC
Impact of the Arts in Ontario
Research Publications
About Us
Expand
Contact Us
OAC Strategic Plan 2014-2020
Staff Directory
Board of Directors
Accountability and Governance
Jobs for Individuals
Public Feedback Form / Complaints
Apply Now
Home
Show more
Close
Home
Close
Grants
Show more
Close
Grants
Close
Explore Grants By...
Activity
Funding Framework
Creating and Presenting
Building Audiences and Markets
Engaging Communities and Schools
Developing Careers and Arts Services
Discipline
Dance
Literature
Media Arts
Multi and Inter-Arts
Music
Theatre
Visual Arts
Priority Group
Artists of Colour
Deaf Artists and Artists with Disabilities
Francophone Artists
Indigenous Artists
New Generation Artists
Artists Living in Regions Outside Toronto
General Granting Information
New to OAC?
Nova User Guide
Guide to Operating Programs
Guide to Project Programs
Guide to Assessment
Grant Results
Grant Program Deadlines and Important Dates
Awards
Show more
Close
Awards
Close
Visual artist Kent Monkman receives the Artist award the 2017 Premier's Awards for Excellence in the Arts. (Photo: Bard Azima)
Ontario Arts Council Awards
Chalmers Family Fund
Government of Ontario Awards
Pauline McGibbon Award
Premier's Awards for Excellence in the Arts
Ontario Arts Foundation Awards and Funds
For Donors
Access & Equity
Show more
Close
Access & Equity
Close
Remapping the Illegitimate Border (Countering the Legacy of the War of 1812 and the Treaty of Ghent)
, an installation piece by artist Dylan Miner in collaboration with Indigenous and Latino Youth of Waawayeyaattanong, the Autonomous Windsor-Detroit Borderlands, at the Art Gallery of Windsor during the
Border Cultures: Part One (homes, land)
exhibition. (Photo: Frank Piccolo)
Accessibility Plan
2017 Annual Status Report on Year Five of OAC’s Multi-Year Accessibility Plan
Equity Plan
Alternative Services and Application Processes
Priority Group
Artists of Colour
Deaf Artists and Artists with Disabilities
Francophone Artists
Indigenous Artists
New Generation Artists
Artists Living in Regions Outside Toronto
Public Feedback Form / Complaints
Guide to Providing Application Support
Would you like to be an OAC peer assessor?
Outreach and Development
News & Resources
Show more
Close
News & Resources
Close
Photographer Nadya Kwandibens (
right
) receives the 2018 Ontario Arts Council Indigenous Arts Award from OAC Chair Rita Davies (
left
) during the Indigenous Arts Festival at Fort York in Toronto. (Photo: Brendan Albert)
News
Clelia Farrugia and Soraya Peerbaye named new Theatre and Dance Officers
Alexandra De Gasperis appointed to board of directors
OAC launches search as Theatre and Dance Officers announce retirements
Board of directors appoints Carolyn Vesely, new CEO
Upcoming changes to applicants' artistic examples in Nova
Resources
Annual Report 2018-2019
Annual Report 2017-2018
Grants Listing 2017-2018
Logo and Acknowledgment
Share your photos with OAC
Research & Impact
Show more
Close
Research & Impact
Close
Small-press publisher Paper Rocket displays assorted books during the Toronto Comic Arts Festival at the Toronto Reference Library. (Photo courtesy of Toronto Public Library)
OAC Grant Statistics
Open Data
Performance Measures
Program Evaluation at OAC
Impact of the Arts in Ontario
Research Publications
About Us
Show more
Close
About Us
Close
Trombone Shorty & Orleans Avenue perform during the Ottawa Jazz Festival at Confederation Park. (Photo: Chris Parker)
Contact Us
OAC Strategic Plan 2014-2020
Staff Directory
Board of Directors
Accountability and Governance
Jobs for Individuals
Public Feedback Form / Complaints
Search
Close
Search Box
Clear Text
Grants
All
Grants Advanced Search
Search Box
Grants
All
Grants Advanced Search
Apply Now
Home
Grants
General Granting Information
Nova User Guide
In This Section
Activity
Funding Framework
Creating and Presenting
Building Audiences and Markets
Engaging Communities and Schools
Developing Careers and Arts Services
Discipline
Dance
Literature
Media Arts
Multi and Inter-Arts
Music
Theatre
Visual Arts
Priority Group
Artists of Colour
Deaf Artists and Artists with Disabilities
Francophone Artists
Indigenous Artists
New Generation Artists
Artists Living in Regions Outside Toronto
General Granting Information
New to OAC?
Nova User Guide
Guide to Operating Programs
Guide to Project Programs
Guide to Assessment
Grant Results
Grant Program Deadlines and Important Dates
Resources
Nova User Guide
Guide to OAC Project Programs
Guide to OAC Operating Programs
Guide to OAC Assessment
Guide to OAC Support Material
Grant Program Deadlines and Important Dates
Logo and Acknowledgement
Showcase your photos on our website and publications
OAC Geographic Regions Maps (PDF)
Nova User Guide
Applying online is a three step process.
You must (1) register and activate your personal account, (2) set up an organization profile, (if applicable), and then (3) fill out an application.
Follow these steps to apply online, and to troubleshoot issues that may arise during in the online application process.
Note:
the screen captures may change slightly as Nova is refined.
Before You Begin
Technology requirements to use Nova.
Step 1: Register Your Personal Account, Then Activate It
Register your personal account.
Troubleshooting tips
: If you get a pop-up window that says “contact with this email address already exists in our database”
Activate your personal account.
Step 2: Set Up an Account for Your Organization/Group (if applicable)
Initial set-up.
Managing affiliations.
Managing your group’s profile.
Step 3: Start Your Application
Ensuring you’re on the correct profile.
Finding the right application form.
Working on your application.
Troubleshooting tips
: Our top advice for working on your application.
Submitting your application
.
What happens to your draft applications when a deadline closes.
Questions?
For the quickest response to questions you have about preparing and submitting your applications or final reports in Nova, email the program administrator for the program. Please refer to
OAC staff directory
for contact information.
Before You Begin
Technology Requirements to Use Nova
High-speed internet access.
Computer with at least 1.6 GHz processor, 1 gigabyte of memory and working antivirus software.
The latest version of one of the following web browsers, with pop-up windows enabled:
Browser Options for PC
Chrome (Recommended)
Compatible Versions: 64, 63
Latest Version:
Download the latest Chrome
Pop-ups:
How to allow pop-ups
Clear Cache:
How to clear cache
Internet Explorer
Compatible Version: 11
Latest Version:
Download the latest IE
Pop-ups:
How to allow pop-ups
Clear Cache:
How to clear cache
Browser Options for Mac
Firefox (Recommended)
Compatible Version: 58, 57
Latest Version:
Download the latest Firefox
Pop-ups:
How to allow pop-ups
Clear Cache:
How to clear cache
Chrome
Compatible Versions: 64, 63
Latest Version:
Download the latest Chrome
Pop-ups:
How to allow pop-ups
Clear Cache:
How to clear cache
Safari
We do not recommend using Safari.
Step 1: Register Your Personal Account, Then Activate It
Register Your Personal Account
Go to
grants.arts.on.ca
.
Click on the
Register Here
button, near the bottom of the page.
Fill out and submit the Nova registration form.
Note:
the email address you use to create an account should be your own personal address, not a shared address.
Check your email for a message with the subject line “
Welcome to NOVA
.”
Troubleshooting tips
: If you get a pop-up window that says “contact with this email address already exists in our database”.
This means that there is already a Nova account connected to your email address. This is nothing to worry about, though – most likely, it means that OAC had your email address on file from a previous grant application you submitted.
To access your account, you will need to
request a new password
:
Click on
Forgot Password
, located under the Nova login button.
Follow the instructions onscreen.
Check your email inbox for a message, which will have temporary password. Login with the temporary password, then create a new password.
Activate Your Personal Account
Login to your account.
Review the section called
Important Information Before You Apply
.
Add/update your contact information by going to the
Profile
drop-down list at the top right, and choosing
Update Profile
. Make sure to fill out all mandatory fields.
Note:
The email address in this section is the same email you used to register your account. If you change your email address in this section, you’ll then need to use the new email to login.
Review the section called
Terms and Conditions / Notice of Collection
. Confirm that you accept the conditions of access.
Click the
Activate
button at the bottom of the screen.
If you miss this step you will not be able to apply for a grant
.
Step 2: Set Up an Account for Your Organization/Group (if applicable)
Initial Set-Up
If your organization has applied for an OAC operating grant before:
You will receive an email with instructions on how to access your organization’s profile in Nova at least two months before the deadline for your program.
If you haven’t received an email by this point, please contact the program officer.
Once you have access to your organization’s profile, review the information already in Nova. Click on
Profile
in the top right corner. Then, select
Update Organization Profile
from the drop-down menu.
Review and update the information listed, then click
Save Draft
.
If your organization/group has applied for an OAC project grant before:
Login to Nova using your personal account.
Check to make sure you’re on your personal account by looking for your name in the top left corner of the screen, next to the OAC logo.
Go to
Profile
in the top right corner of the page. Choose
Request Affiliation with an Organization/Group
from the drop-down menu.
Type the name of your group into the search field and select your organization’s name from the search results.
Note:
If your organization’s name doesn’t appear in the search results, you will need to set up an account for the organization. See the next section for information on how to do this.
Complete the mandatory fields on-screen, including your role/title within the organization and your business email address. Then, click on the
Submit
button.
Note:
The email address you enter here is the one OAC will use for correspondence with you. It should be the email address you use for your work with this organization. It can be the same as or different from your login email.
One of two things will happen, depending on whether you’re the first in your organization to access its Nova profile:
If you are the first person, your personal profile will automatically be affiliated to your organization’s profile.
If someone else in your organization is already affiliated with its profile, you will need to request an affiliation. See the section
Requesting an affiliation
for how to do this.
If your organization/group has never applied for an OAC grant:
Login to Nova using your personal account.
Create a profile for your organization by going to
Profile
in the top right corner of the page, then choosing
Request Affiliation with an Organization/Group
.
Click on the button that says
Register New Organization/Group
.
A pop-up window will appear. In the
Operating Name
field, enter the name of your organization.
Select an option from the
Organization Type
drop-down menu. Click
Submit
.
Complete the mandatory fields onscreen, including your role/title within the group and your email address. Then, click on the
Submit
button.
Note:
The email address you enter here is the one OAC will use for correspondence with you. It should be the email address you use for your work with this organization. It can be the same as or different from your login email.
Managing Affiliations
Requesting an affiliation with an organization/group
Login to Nova using your personal account.
Check to make sure you’re on your personal account by looking for your name in the top left corner of the screen, next to the OAC logo.
Go to
Profile
in the top right corner of the page. Choose
Request Affiliation with an Organization/Group
from the drop-down menu.
Type the name of your group into the search field and select your organization’s name from the search results.
Note
: If your organization’s name doesn’t appear in the search results, you will need to set up an account for the organization. See the section titled
If your organization/group has never applied for an OAC grant.
Complete the mandatory fields on-screen, including your role/title within the organization and your business email address. Then, click on the
Submit
button.
Note:
The email address you enter here is the one OAC will use for correspondence with you. It should be the email address you use for your work with this organization. It can be the same as or different from your login email.
One of two things will happen, depending on whether you’re the first in your organization to access its Nova profile:
If you are the first person, your personal profile will automatically be affiliated to your organization’s profile.
If someone else in your organization is already affiliated with its profile, they will receive an email noting that you have requested to be affiliated. Once they approve your affiliation, you will be sent an email confirmation.
Approving requests for affiliations
To approve a request for affiliation to your organization, click on
Profile
in the top right corner. Then, select
Manage Organization Affiliations
from the drop-down menu.
You will be directed to the
Requestor
page. Select the requestor.
You will then be directed to their
Affiliation Details
page. Scroll to the bottom of the page and click
Approve
.
You can select an affiliation end date for a requestor to have access for a set period of time.
Removing organization/group affiliations
If you disassociate a person from your organization’s profile, they will no longer be able to access it.
To disassociate a person from your organization’s profile, click on
Profile
in the top right corner. Then, select
Manage Organization Affiliations
from the drop-down menu.
You will be directed to the
Requestor
page. Select the person who you wish to disassociate.
You will then be directed to their
Affiliation Details
page.
To disassociate this person immediately, select yesterday’s date under
Affiliation End Date
.
You can also choose a date in the future when they will no longer be able to access the account.
Modifying an organization/group member’s title or contact information
Click on Profile in the top right corner. Then, select
Manage Organization Affiliations
from the drop-down menu.
You will be directed to the
Requestor
page. Select the person’s name.
You will then be directed to their
Affiliation Details
page. Here, you can update a person’s title, email address and phone number.
Managing Your Organization/Group's Profile
Accessing your organization/group’s profile
To access your organization’s profile in Nova, you’ll need to switch from your personal profile to the organization’s profile. Once you’ve been affiliated to an organization (see previous section for information on this), you can follow the instructions below.
To switch from your personal profile to your organization’s profile, click on the top menu bar, where you see either
*Personal / Personnel
or the name of an organization.
Note
: You can be affiliated to more than one organization in Nova, so make sure to choose the correct organization here.
You should now see the name of your organization next to the OAC logo. This confirms that you have accessed the organization’s profile.
To return to your personal profile, click on the top menu bar, where you see the name of the organizations, and select
*Personal / Personnel
.
Modifying your organization/group’s profile
After following the instructions above to access your organization’s profile, click on Profile, at the top-right corner of the screen. Select
Update Organization Profile
from the drop-down menu.
Add/confirm your organization’s
Operating Name
and
Legal Name
.
Choose your
Organization Type
. This will determine which mandatory fields appear on your application form, so be sure to choose the correct type.
Assign the
Key Contacts
for your organization.
For
Head of Board/Governing Body Name
, type the name of your Board Chair/President.
In the field on the right, add their email address.
Note: Their email goes here because they do not need to register a personal account in Nova.
For
Head of Organization
,
Head of Administration
and
Head of Artistic/Programming
, you will see a drop-down menu with the names of people who have already been affiliated to the organization.
If you don’t see a person’s name on this list, they need to request affiliation with the organization. Refer to the instructions in the
Managing Affiliations section
; once their request has been approved, you’ll see their name on the drop-down menu.
Add/confirm your organization’s contact information, including
Permanent Physical Address
and
Mailing Address
.
Step 3: Start Your Application
Ensuring You Are on the Correct Profile
Individual artists
To apply as an individual, you must be in your personal profile. If you don’t see your name next to the OAC logo at the top left side of the page:
Click on the top menu bar, where you see the name of an organization.
From the drop-down menu, select
*Personal / Personnel
.
Check to make sure your name now appears next to the OAC logo.
Organizations/groups
To apply on behalf of an organization, you must be in that organization’s profile. If you don't see the organization’s name next to the OAC logo at the top left side of the page:
Click on the top menu bar, where you see
*Personal / Personnel
.
From the drop-down menu, select the name of the organization, then click
Apply
.
Check to make sure your organization’s name now appears next to the OAC logo.
Finding the Right Application Form
Project programs
Go to the section called
Funding Opportunities
.
Locate the name of the program you wish to apply to, and then click
Apply
to begin.
You can also start with the
Details
button for full program information.
Operating programs
Your application form will be listed under the section called
Applications for [Your Organization Name]
.
Click
Open
to begin.
Working on Your Application
Troubleshooting tips
: Our top advice for working on your application.
Do not use the Back, Forward or Refresh
buttons in your web browser. You may lose any unsaved work, or the system may log you out.
When working on your application,
save your work
often to ensure you don’t lose it.
As you work on your application, routinely click
Validate Application
. This will highlight any incomplete fields that you need to fill out (include direct links to the fields requiring information).
Remember to fill out all the information required on the
Declaration
tab of the application. If this section is incomplete, you will not be able to submit the application.
Uploading artistic examples
Once you are in the application, go to the
Support Material
tab. Then check what file format(s) and size(s) are accepted for this program.
To attach a file, scroll down to the section for your file type (video, audio, etc.) and click on
Upload
.
A pop-up window will appear with options to drag-and-drop or browse to upload your file. You can upload multiple files at once.
After uploading the file, close the pop-up window.
Next, click on
Edit Required Information
, which will appear below your uploaded file and fill out the mandatory information about your file.
If your file is 300MB or larger, you will need to upload the file to Vimeo. Under the
Audio – Vimeo Links
or
Video – Vimeo Links
section, click
Open
and click on the plus sign and fill out the mandatory information.
Adding a co-applicant (if applicable)
Begin your application.
Go to the
Add Individual Co-applicant
or
Add Organization Co-applicant
tab of the application, located below the
Main
tab.
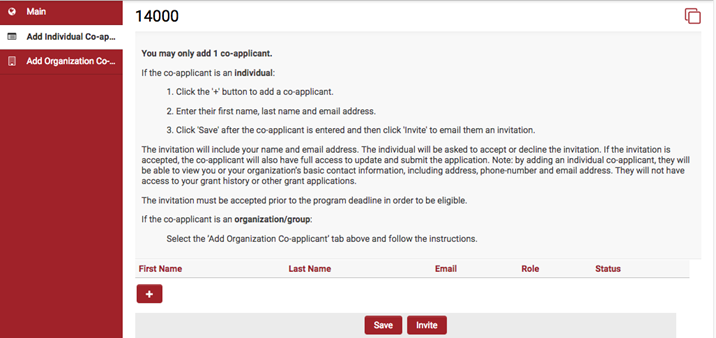
Follow the instructions to add a co-applicant to your application.
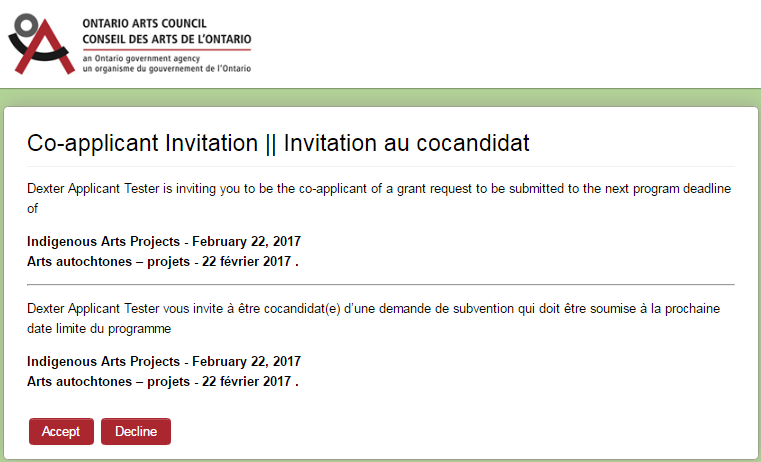
The co-applicant will then be sent an email invitation to access the application, with an option to accept or decline.
If they accept the invitation, both of you will see the application in your
Applications for [Applicant Name]
section. Now, either one of you can work on and submit the joint application.
Submitting your application
When you are ready, press
Submit Application
at the bottom of the page.
Now, when you go to your
Applications for [Applicant Name]
section, the status of your application will have switched from
Draft
to
Submitted
.
To download a copy of your application, click on
Print Preview
at the top of the page, and save your application as a PDF.
What happens to draft applications when a deadline closes?
Your application must be submitted by 1 p.m. EST on the deadline date.
The system will not notify you that the deadline has passed. If you are still working on your application past the 1 p.m. EST deadline, it will continue to allow you to complete your application but will not allow you to submit your application.
The status of a draft application will change to
Not Submitted
at 1 p.m. EST on the deadline day. This status makes your application read-only.